
https://appsignal.com/api/mcp. Authenticate once, then add the endpoint to your AI tool using the instructions for your editor or app.
Authentication
You need an AppSignal account to get started. AppSignal MCP supports two authentication methods — pick whichever fits the AI agent you’re configuring:- OAuth — sign in with your AppSignal account once. That sign-in exposes the AppSignal MCP toolset available to you. The simplest setup for every agent in this guide: each one connects to the endpoint directly.
- Bearer token — generate a long-lived MCP token. Each token can be scoped to specific applications, configured to expose specific tools, and set to automatically expose new tools as they ship. Best when you want to limit what an agent can do.
- Select your profile icon.
- Go to Account Settings.
- Select MCP Tokens to create a new token.
Configuration
Configure AppSignal MCP in your AI agent’s settings using the HTTP endpointhttps://appsignal.com/api/mcp. Each of the following sections has tabs for OAuth and Bearer token — pick whichever you set up in the Authentication section.
Claude Code
- In the Claude Code chat, run
/mcpto open the MCP server list and status view.
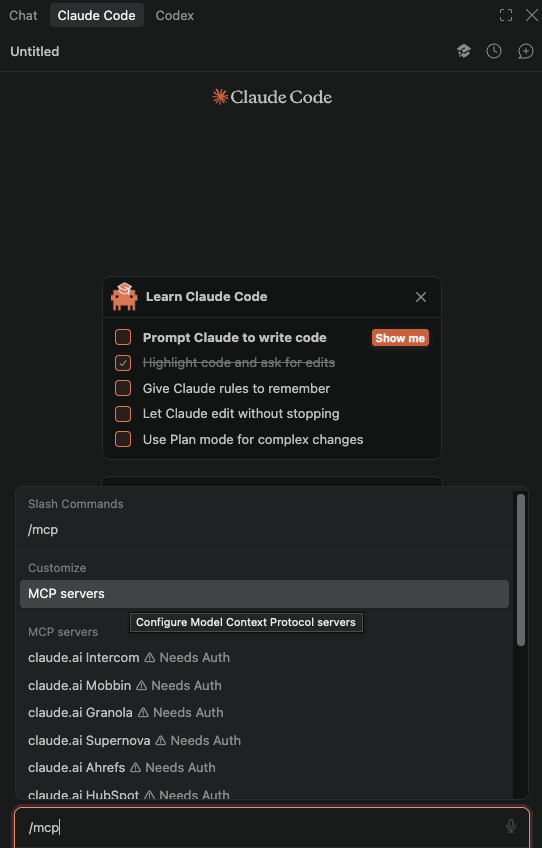
Running /mcp in Claude Code opens the MCP servers view inside VS Code.
- If AppSignal is not listed yet, select Add server. Enter
AppSignalas the name, choose HTTP (remote) as the transport, enterhttps://appsignal.com/api/mcpas the URL, leave headers empty for OAuth, and choose the scope you want.
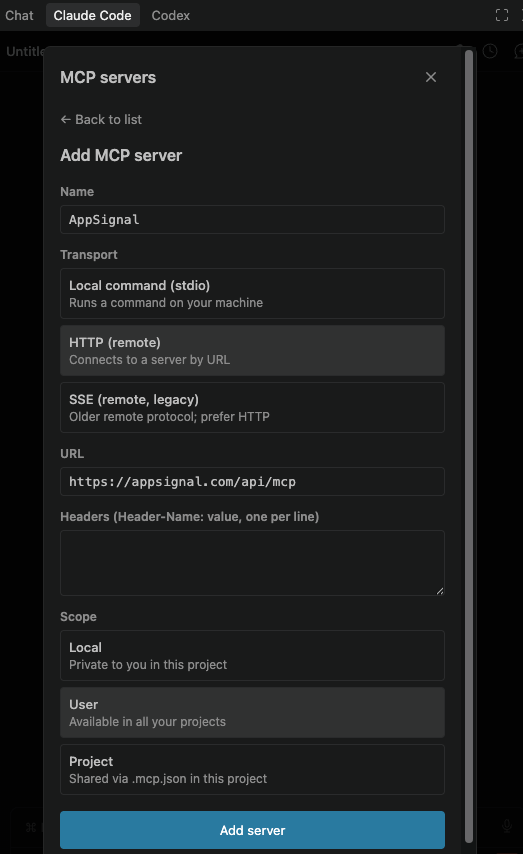
Adding AppSignal as an HTTP remote MCP server in Claude Code inside VS Code.
- Open the AppSignal entry from the MCP server list. If it shows Needs Auth, select Authenticate.
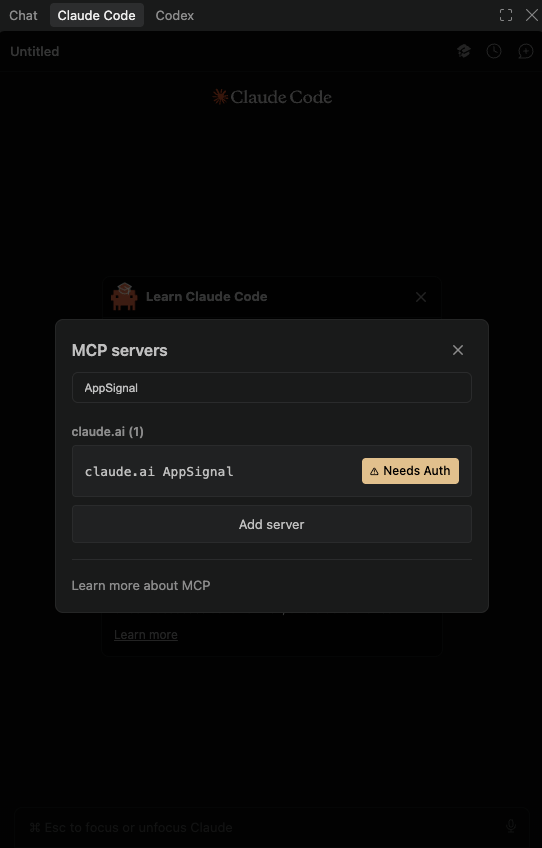
The AppSignal connector can appear in Claude Code's MCP list with a Needs Auth status before OAuth is completed.
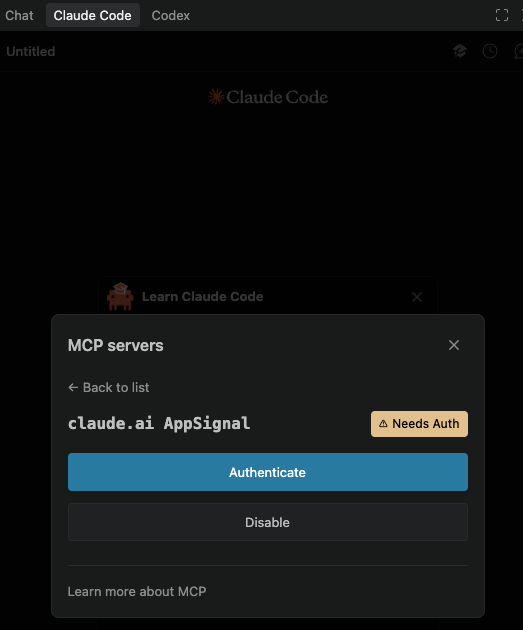
Selecting the AppSignal entry opens its detail view, where you can start authentication.
- In the browser, select Continue connecting to finish the connector flow Claude started.
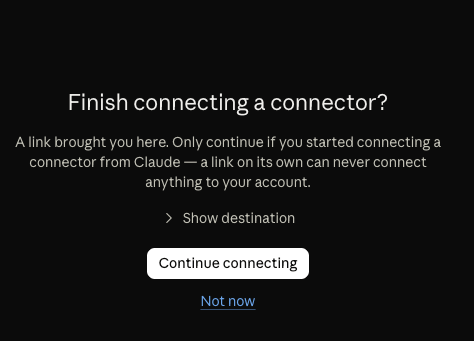
Claude asks you to confirm that you want to finish connecting the AppSignal connector in the browser.
- In AppSignal, choose your organization and, optionally, the applications to expose, then select Allow access.
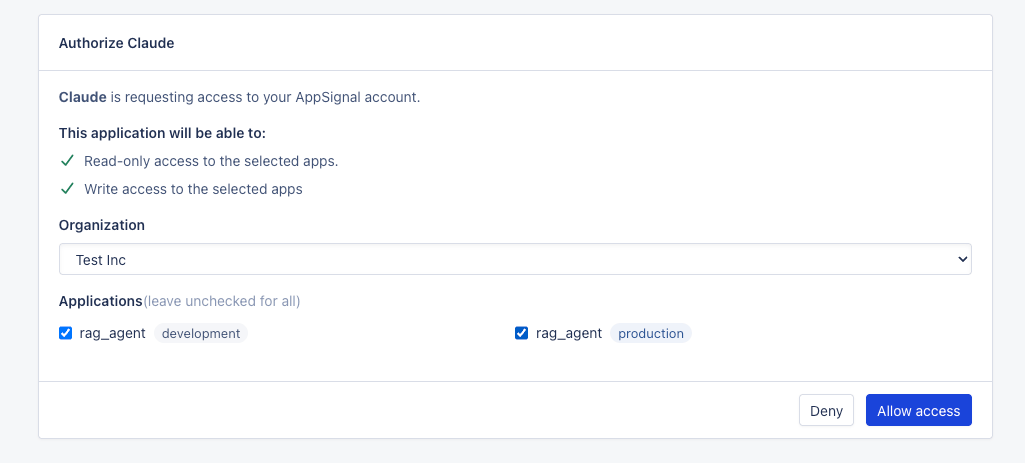
AppSignal's OAuth screen lets you choose the organization and optionally limit the applications Claude can access.
- Return to VS Code and confirm that Claude Code reconnects and shows AppSignal as Connected.
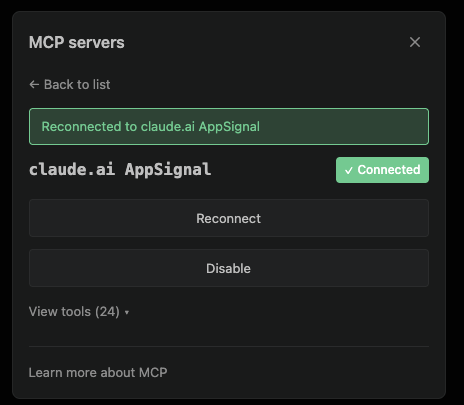
After OAuth finishes, Claude Code reconnects to AppSignal and shows the connector as connected.
/mcp enable <server-name>, /mcp disable <server-name>, and /mcp reconnect when you need to re-enable or refresh a server from chat.
If the Claude connector still shows Needs Auth, reopen OAuth from the terminal inside VS Code, not from the Claude chat:
Claude app
The Claude app — Claude.ai on the web, and the desktop and mobile apps — connects to AppSignal MCP as a custom connector over OAuth. There’s no Bearer token option in the app.- In Claude, open Settings, then Connectors.
- Select Browse, search for
appsignal, and open the AppSignal connector. If it isn’t listed, select Add custom connector and enter the URLhttps://appsignal.com/api/mcpinstead. - Select Connect, then complete the AppSignal sign-in when prompted.
- Start a chat and try a prompt such as “List my AppSignal applications”. You can connect or disconnect AppSignal at any time from Settings → Connectors.
- Open the connector’s Tool permissions to choose when Claude may call each tool. Tools are grouped into read-only and write/delete, and you can set a whole group or a single tool to always allow, ask for approval, or never allow. Only the tools your sign-in exposes are listed.
Cursor
Add AppSignal from Cursor’s settings, or by editingmcp.json directly.
To add it from the settings UI:
- Go to your Cursor settings.
- Open the Customize tab, select MCPs, then select + Add New MCP Server.
- Select User, enter the values below in the JSON file that opens, and save your configuration.
~/.cursor/mcp.json and makes AppSignal available everywhere. The dropdown also lists your open workspaces under Workspaces, and picking one writes .cursor/mcp.json in that workspace instead, which you can commit so your team picks it up.
- OAuth: leave the
headersout. Cursor opens a browser tab where you grant access and choose the authorization scopes, then finishes the connection. - Bearer token: include the
Authorizationheader. Cursor authorizes with the scopes you configured on the token and connects without opening a tab.
appsignal appears under Connected in the MCPs list with a green indicator and a tool count once it is working. See the Cursor MCP docs for the full schema.
Devin
Devin, formerly Windsurf, connects to AppSignal from its Cascade MCP marketplace. You can directly edit its~/.codeium/windsurf/mcp_config.json file or from the UI with the following steps:
- Run Devin: Cascade MCP Registry from the command palette to open the Cascade MCP marketplace.
- Select Add custom MCP.
- Enter the values below in the
mcp_config.jsonthat opens, then save. - Select the refresh control next to the server to reload it.
serverUrl entry as a streamable HTTP server. The entry above authorizes with an MCP token. To use OAuth instead, leave the headers out and Devin opens the browser sign-in when it connects. See the Devin MCP docs for more configuration options.
Zed
Add AppSignal from Zed’s settings, or by editing the settings file directly. To add it from the settings UI:- Open Settings → AI → General → MCP servers → Configure, or run agent: open settings from the command palette (
Cmd+Shift+P) and select MCP servers. - Select Add server, then Add remote server.
- Enter
appsignalas the name andhttps://appsignal.com/api/mcpas the URL. - If you’re using a token rather than OAuth, add an
Authorizationheader.
context_servers section:
Authorization header is omitted, Zed initiates the standard MCP OAuth flow against AppSignal and caches the session in your keychain, so you only sign in once. Zed applies settings changes without a restart. See the Zed MCP docs for the full context_servers schema.
VS Code
Add AppSignal from VS Code’s MCP settings, or by editingmcp.json directly. A workspace .vscode/mcp.json applies to one project. To use AppSignal across every project, put the same servers block in your user-level configuration instead, which you can open with MCP: Open User Configuration from the command palette (Cmd+Shift+P).
These settings configure VS Code’s own MCP integration, such as Copilot Chat. If you’re using the Claude Code extension inside VS Code instead, follow the Claude Code section above for Claude’s own MCP panel, /mcp flow, and claude mcp login terminal fallback.
If your organization manages GitHub Copilot, make sure MCP servers in Copilot is set to Enabled in your organization settings (Settings → Copilot → Policies → Features → MCP servers in Copilot).
To add it from the settings UI:
- Run MCP: Add Server from the command palette (
Cmd+Shift+P). - Choose HTTP (HTTP or Server-Sent Events) as the type.
- Enter
https://appsignal.com/api/mcpas the URL andappsignalas the name. - Choose whether to save it to your Workspace or Global configuration.
mcp.json and lists it under User or Workspace in the MCP Servers view. Open that mcp.json to see the entry, where VS Code shows its running state and tool count above the server name.
To edit the file directly instead, use these values:
.mcp.json file or a user ~/.copilot/mcp-config.json file instead of relying only on .vscode/mcp.json. See the VS Code MCP docs for input variables, headers, and Agent Host behavior.
GitHub Copilot CLI
The GitHub Copilot CLI uses OAuth for MCP authentication. Run the following to add AppSignal:~/.copilot/mcp-config.json; a workspace-level .mcp.json works too. Run copilot mcp list to confirm AppSignal is registered with type http. See the GitHub Copilot CLI MCP docs for the interactive /mcp add flow.
In a GitHub Copilot terminal session, /mcp and /mcp show appsignal can help you inspect available MCP connections and also open the browser for OAuth if needed.
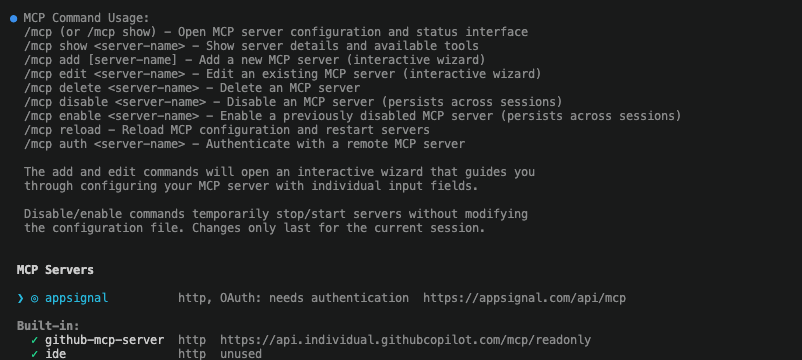
/mcp in GitHub Copilot lists the configured MCP servers and shows when AppSignal still needs authentication.
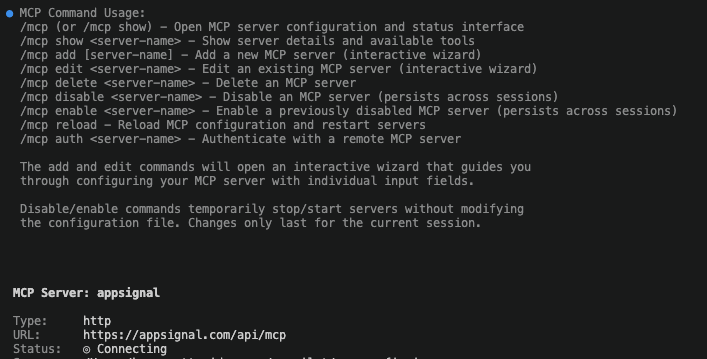
When GitHub Copilot needs authorization, it opens AppSignal in your browser so you can approve access. While that browser flow is still completing, /mcp show appsignal can briefly report Connecting.
Server "appsignal/auth" not found before the server settles on Status: Connected.
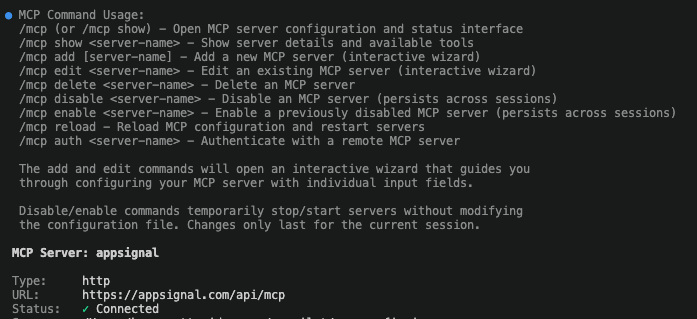
Once authorization completes, /mcp show appsignal reports the server as connected.
Gemini CLI
Gemini CLI reads MCP servers from~/.gemini/settings.json (user-level) or .gemini/settings.json in a project. Add AppSignal under mcpServers:
headers out to use OAuth: when the endpoint returns 401, Gemini CLI discovers the flow and opens the browser sign-in.
You can also add the server from the command line. Pass --transport http, because gemini mcp add defaults to the stdio transport and would otherwise store the URL as a command to run:
/mcp list to confirm it connected. See the Gemini CLI MCP docs for the full mcpServers schema and gemini mcp commands.
OpenAI Codex
Codex connects to AppSignal MCP as a streamable HTTP server. It shares one configuration across the CLI, the IDE extension, and the ChatGPT desktop app, so you only set this up once. To use OAuth, add the server with--url:
codex mcp login appsignal if you need to authenticate again later.
To use a token instead, edit ~/.codex/config.toml (or .codex/config.toml in a project). Set bearer_token_env_var to the name of an environment variable that holds an MCP token:
APPSIGNAL_MCP_TOKEN in your environment. See the Codex MCP docs for http_headers, OAuth, and the full mcp_servers schema.
Verify the connection
After adding the server, confirm your agent can reach it before you rely on it.- Claude Code: run
claude mcp list, where AppSignal should show as✔ Connected. In Claude Code inside VS Code, run/mcpto open the MCP server view and confirm the connector shows as connected. - Codex: run
codex mcp list. The Auth column showsOAuthorBearer tokenfor a server that is set up correctly. Inside a session,/mcplists the connected servers and their tools. - GitHub Copilot CLI: run
copilot mcp list, where AppSignal should be listed with typehttp. In a GitHub Copilot terminal session,/mcp show appsignalshould eventually reachStatus: Connected. - Gemini CLI: run
/mcp listinside a session. If AppSignal is missing from a correct config, check that you have trusted the folder. - Zed: open Settings → AI → MCP servers. The indicator next to
appsignalturns green and its tooltip reads “Server is active”. - VS Code: open Copilot Chat and select the tools icon. VS Code starts MCP servers on demand, so AppSignal stays idle until something uses it.
- Cursor: open the MCPs list in settings, where
appsignalappears under Connected with a green indicator and a tool count. - Devin: open the Cascade MCP marketplace, where
appsignalappears under Installed as Enabled with its tool count.
app_name/app_environment pairs confirms the tools are working. If the agent reports no applications, check that you authorized the right organization during OAuth, or that your MCP token is scoped to the applications you expect.
For what AppSignal MCP logs, how to fix a failing tool call, and what the toolset deliberately leaves out, see Using AppSignal MCP.
Getting help
We encourage you to join our Discord community where you can:- Get help with AppSignal MCP setup
- Share feedback and suggestions
- Connect with other developers using AppSignal MCP
- Stay updated on new features and improvements
#mcp channel where our team actively monitors and responds to questions.