> ## Documentation Index
> Fetch the complete documentation index at: https://docs.appsignal.com/llms.txt
> Use this file to discover all available pages before exploring further.
# AppSignal MCP
AppSignal MCP is currently in preview. Join our{" "}
Discord community to help test and
shape this implementation.
[Model Context Protocol (MCP)][mcp] enables AI agents and AI code editors like Claude, Cursor, Windsurf, Zed, VS Code, and GitHub Copilot to interact with external tools and data sources. AppSignal MCP gives those agents direct access to your monitoring data: errors, traces, logs, metrics, and more.
AppSignal MCP is a public HTTP endpoint at `https://appsignal.com/api/mcp`. Most agents connect to it directly. If you'd rather run a local proxy — for example, in an environment that restricts outbound traffic — an [optional Docker image][github-repo] is available.
## What you can access
AppSignal MCP exposes read and write access to your monitoring data across seven areas. Each area maps to a permission you can configure when authenticating: with an MCP token, set each area to `read`, `write`, or disabled; with OAuth, all read and write tools are exposed at once.
What you get back depends on what your apps send to AppSignal. If your app is not sending logs, `get_log_lines` will not return anything. AppSignal MCP is a gateway to data AppSignal already has. It does not collect new data on its own.
### Available now
* **Error incidents** (read + write): list and search exceptions, inspect stack traces, update state and severity, assign handlers, and add notes
* **Performance** (read): rank slowest actions, pull traces, walk span trees, and inspect span attributes. Sample-based for standard Ruby and Elixir apps; OpenTelemetry traces for apps sending OTel data
* **Anomaly detection** (read + write): browse alerts, list existing triggers, and create, update, or archive triggers
* **Logging** (read + write): query log lines with AppSignal's expression syntax, and set up log ingestion rules: filter, trigger, and metrics actions. Particularly powerful for stitching together a customer journey across log sources, errors, and traces in one prompt — see [reconstructing a customer journey](/mcp/reference#reconstructing-a-customer-journey)
* **Metrics** (read): discover metric categories (including `host_metrics`), list metric names and tags, and pull timeseries or aggregated values
* **Dashboards** (read + write): create dashboards, and add or update chart visuals
* **App discovery** (read): list your applications, environments, namespaces, users, notifiers, log sources, log line actions, and deploy markers
For the full list of tools, parameters, and example prompts, see the [MCP Tool Reference](/mcp/reference).
### Outside the toolset's scope
A few AppSignal features are intentionally not exposed through dedicated MCP tools. In most cases there's already a better way to access the data, or a natural-language interface isn't the right fit for the job. Every tool exposed also takes up space in your agent's context, so we'd rather keep the toolset focused than mirror every part of the app.
* **Uptime monitor management**: uptime results are stored as metrics (`uptime_monitor_error_count` and `uptime_monitor_duration`), so you can already query them through the existing metrics tools (`get_metric_names`, `get_metric_tags`, `get_metrics_timeseries`, and `get_metrics_list`). Dedicated tools for listing or creating uptime monitors are not on the roadmap at the moment.
* **Notifier, user, and deploy marker management**: creating or modifying these requires owner-level permissions and has real consequences: a misinterpreted prompt could grant the wrong person access or misroute alerts. Admin operations like these are better handled in the AppSignal UI, where they're explicit and easy to audit. You can still read notifiers, users, and deploy markers through `get_app_resources`.
* **Custom metric and signal ingestion**: AppSignal's ingest path runs on dedicated endpoints optimized for high-throughput delivery, and AppSignal MCP is not designed for pushing data. To send [custom metrics](/metrics/custom), use the AppSignal integration in your application.
### On the roadmap if there's demand
* **Process monitor querying**: read access to cron and heartbeat process monitor data. We'd like to gauge interest before adding this.
These are current stances and can change as the way agents work evolves. If you hit a wall with the current toolset, let us know in the [Discord community](https://discord.com/channels/1361347709839085671/1387797163513348146) so we can weigh it against the list.
## Authentication
You need an [AppSignal account][appsignal-sign-up] to get started. AppSignal MCP supports two authentication methods — pick whichever fits the AI agent you're configuring:
* **OAuth** — sign in with your AppSignal account once. Access is granted at the application level and exposes all read and write tools at once. The recommended path for GitHub Copilot CLI, and the simplest setup for editors that natively support remote MCP servers (Claude Code, VS Code) or that can run [`mcp-remote`][mcp-remote] as a bridge (Cursor, Windsurf, Zed).
* **Bearer token** — generate a long-lived [MCP token][appsignal-mcp-token] with fine-grained permissions per toolset. Each token can be set to `read`, `write`, or disabled per area, scoped to specific applications, and configured to automatically expose new tools as they ship. Best when you want to limit what an agent can do.
If you're getting started and your agent supports OAuth, that's the quicker path. If you need per-tool permissions or per-app scoping, generate an MCP token instead.
To generate a Bearer token:
1. Select your profile icon.
2. Go to **Account Settings**.
3. Select **MCP Tokens** to create a new token.
## Configuration
Configure AppSignal MCP in your AI agent's settings using the HTTP endpoint `https://appsignal.com/api/mcp`. Each section below has tabs for OAuth and Bearer token — pick whichever you set up above.
OAuth support is new across our supported editors. If the OAuth tab errors out
for your editor, fall back to the Bearer token tab and let us know in our{" "}
Discord community so we can
tighten these instructions.
### Claude Code
```bash OAuth theme={null}
claude mcp add --transport http appsignal https://appsignal.com/api/mcp
```
```bash Bearer token theme={null}
claude mcp add --transport http appsignal https://appsignal.com/api/mcp \
--header "Authorization: Bearer your-mcp-token"
```
With OAuth, Claude Code starts the browser-based sign-in flow the first time AppSignal tools are invoked. See the [Claude Code MCP docs][claude-code-mcp] for transport flags and CLI reference.
### Cursor
Edit `~/.cursor/mcp.json`:
```json OAuth theme={null}
{
"mcpServers": {
"appsignal": {
"command": "npx",
"args": ["-y", "mcp-remote", "https://appsignal.com/api/mcp"]
}
}
}
```
```json Bearer token theme={null}
{
"mcpServers": {
"appsignal": {
"url": "https://appsignal.com/api/mcp",
"headers": {
"Authorization": "Bearer your-mcp-token"
}
}
}
}
```
The OAuth setup uses [`mcp-remote`][mcp-remote] as a local bridge to the HTTP endpoint. The browser-based sign-in flow opens the first time Cursor connects. See the [Cursor MCP docs][cursor-mcp] for the full schema.
### Windsurf
Edit `~/.codeium/windsurf/mcp_config.json`:
```json OAuth theme={null}
{
"mcpServers": {
"appsignal": {
"command": "npx",
"args": ["-y", "mcp-remote", "https://appsignal.com/api/mcp"]
}
}
}
```
```json Bearer token theme={null}
{
"mcpServers": {
"appsignal": {
"serverUrl": "https://appsignal.com/api/mcp",
"headers": {
"Authorization": "Bearer your-mcp-token"
}
}
}
}
```
See the [Windsurf MCP docs][windsurf-mcp] for the full schema and OAuth notes.
### Zed
Open your Zed settings file and add the `context_servers` section:
```json OAuth theme={null}
{
"context_servers": {
"appsignal": {
"settings": {},
"enabled": true,
"url": "https://appsignal.com/api/mcp"
}
}
}
```
```json Bearer token theme={null}
{
"context_servers": {
"appsignal": {
"settings": {},
"enabled": true,
"url": "https://appsignal.com/api/mcp",
"headers": {
"Authorization": "Bearer your-mcp-token"
}
}
}
}
```
When the `Authorization` header is omitted, Zed initiates the standard MCP OAuth flow against AppSignal. See the [Zed MCP docs][zed-mcp] for the full `context_servers` schema.
### VS Code
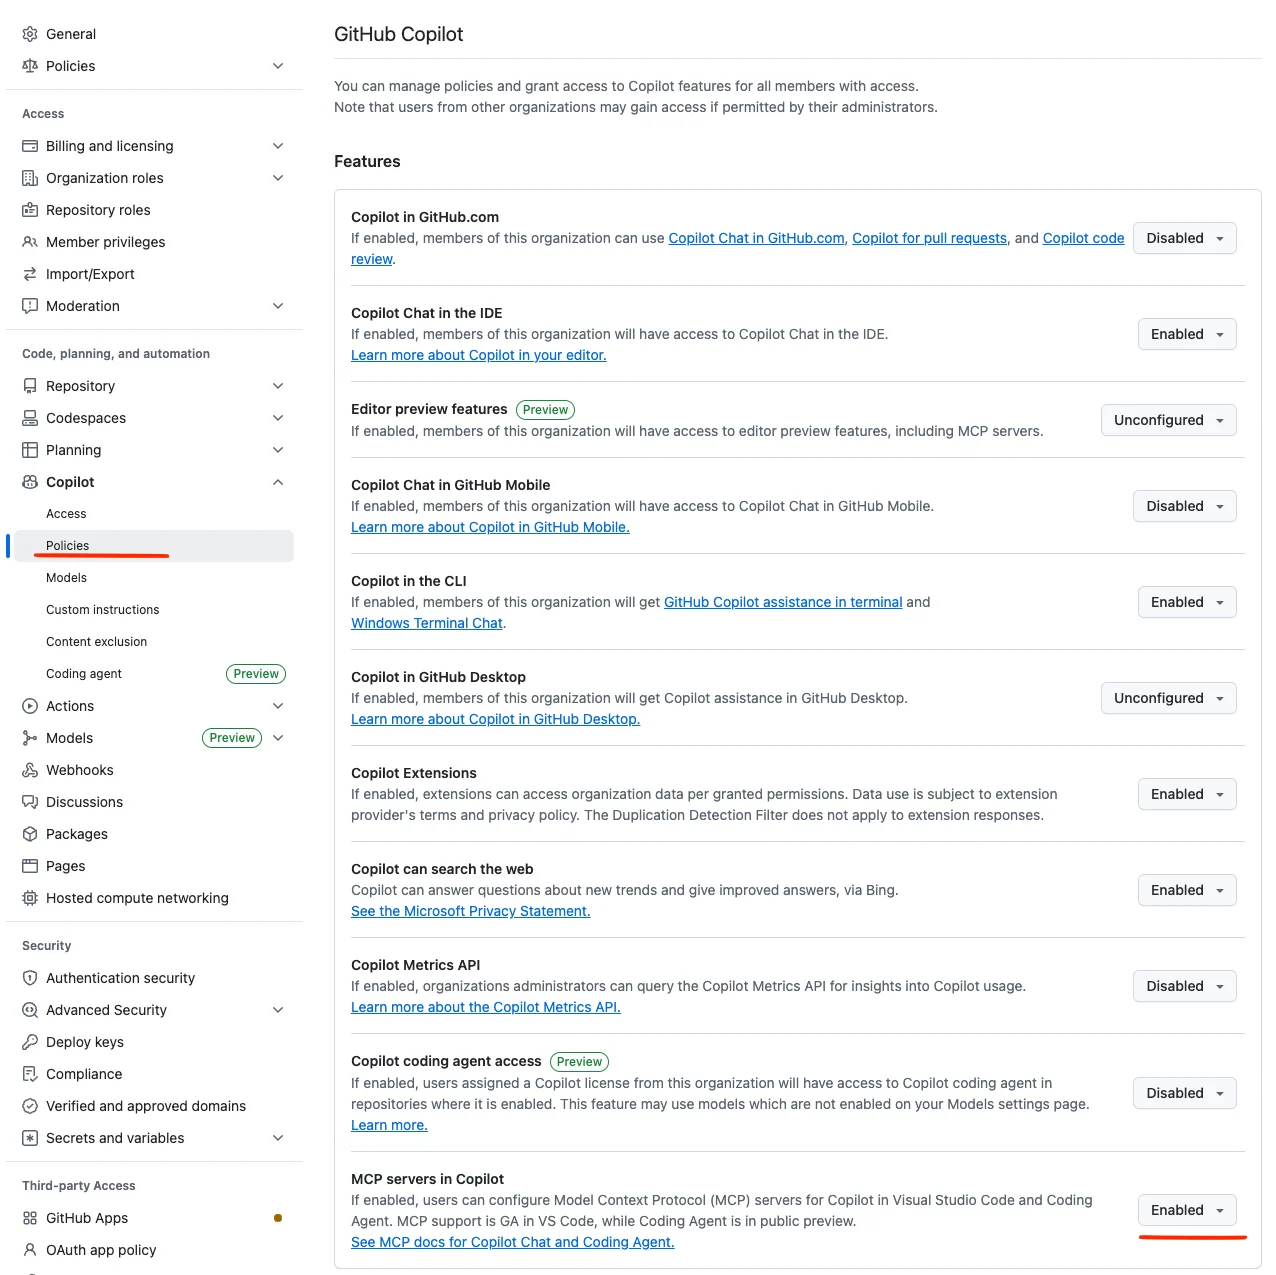
If you are running GitHub Copilot and are signed in under a company account,
make sure to set "MCP servers in Copilot" to "Enabled" under your organization settings > Copilot > Policies.
 Add this to your `.vscode/mcp.json`:
```json OAuth theme={null}
{
"servers": {
"appsignal": {
"type": "http",
"url": "https://appsignal.com/api/mcp"
}
}
}
```
```json Bearer token theme={null}
{
"inputs": [
{
"type": "promptString",
"id": "appsignal_mcp_token",
"description": "AppSignal MCP Token",
"password": true
}
],
"servers": {
"appsignal": {
"type": "http",
"url": "https://appsignal.com/api/mcp",
"headers": {
"Authorization": "Bearer ${input:appsignal_mcp_token}"
}
}
}
}
```
With OAuth, VS Code initiates the sign-in flow the first time AppSignal tools are used. See the [VS Code MCP docs][vscode-mcp] for input variables and headers.
### GitHub Copilot CLI
The GitHub Copilot CLI uses OAuth for MCP authentication. Run the following to add AppSignal:
```bash Bash theme={null}
copilot mcp add appsignal https://appsignal.com/api/mcp
```
Follow the OAuth prompt to authorize AppSignal. Once connected, AppSignal tools will be available in Copilot CLI sessions. See the [GitHub Copilot CLI MCP docs][copilot-cli-mcp] for the interactive `/mcp add` flow and config file location.
## Getting Help
We encourage you to join our [Discord community][discord] where you can:
* Get help with AppSignal MCP setup
* Share feedback and suggestions
* Connect with other developers using AppSignal MCP
* Stay updated on new features and improvements
Look for the dedicated `#mcp` channel where our team actively monitors and responds to questions.
[appsignal]: https://www.appsignal.com
[appsignal-sign-up]: https://appsignal.com/users/sign_up
[appsignal-mcp-token]: https://appsignal.com/users/mcp_tokens
[discord]: https://discord.gg/fT2cbMuQSJ
[github-repo]: https://github.com/appsignal/appsignal-mcp
[mcp]: https://modelcontextprotocol.io/introduction
[mcp-remote]: https://www.npmjs.com/package/mcp-remote
[claude-code-mcp]: https://code.claude.com/docs/en/mcp
[cursor-mcp]: https://cursor.com/docs/mcp
[windsurf-mcp]: https://docs.windsurf.com/windsurf/cascade/mcp
[zed-mcp]: https://zed.dev/docs/ai/mcp
[vscode-mcp]: https://code.visualstudio.com/docs/copilot/chat/mcp-servers
[copilot-cli-mcp]: https://docs.github.com/en/copilot/how-tos/copilot-cli/customize-copilot/add-mcp-servers
Add this to your `.vscode/mcp.json`:
```json OAuth theme={null}
{
"servers": {
"appsignal": {
"type": "http",
"url": "https://appsignal.com/api/mcp"
}
}
}
```
```json Bearer token theme={null}
{
"inputs": [
{
"type": "promptString",
"id": "appsignal_mcp_token",
"description": "AppSignal MCP Token",
"password": true
}
],
"servers": {
"appsignal": {
"type": "http",
"url": "https://appsignal.com/api/mcp",
"headers": {
"Authorization": "Bearer ${input:appsignal_mcp_token}"
}
}
}
}
```
With OAuth, VS Code initiates the sign-in flow the first time AppSignal tools are used. See the [VS Code MCP docs][vscode-mcp] for input variables and headers.
### GitHub Copilot CLI
The GitHub Copilot CLI uses OAuth for MCP authentication. Run the following to add AppSignal:
```bash Bash theme={null}
copilot mcp add appsignal https://appsignal.com/api/mcp
```
Follow the OAuth prompt to authorize AppSignal. Once connected, AppSignal tools will be available in Copilot CLI sessions. See the [GitHub Copilot CLI MCP docs][copilot-cli-mcp] for the interactive `/mcp add` flow and config file location.
## Getting Help
We encourage you to join our [Discord community][discord] where you can:
* Get help with AppSignal MCP setup
* Share feedback and suggestions
* Connect with other developers using AppSignal MCP
* Stay updated on new features and improvements
Look for the dedicated `#mcp` channel where our team actively monitors and responds to questions.
[appsignal]: https://www.appsignal.com
[appsignal-sign-up]: https://appsignal.com/users/sign_up
[appsignal-mcp-token]: https://appsignal.com/users/mcp_tokens
[discord]: https://discord.gg/fT2cbMuQSJ
[github-repo]: https://github.com/appsignal/appsignal-mcp
[mcp]: https://modelcontextprotocol.io/introduction
[mcp-remote]: https://www.npmjs.com/package/mcp-remote
[claude-code-mcp]: https://code.claude.com/docs/en/mcp
[cursor-mcp]: https://cursor.com/docs/mcp
[windsurf-mcp]: https://docs.windsurf.com/windsurf/cascade/mcp
[zed-mcp]: https://zed.dev/docs/ai/mcp
[vscode-mcp]: https://code.visualstudio.com/docs/copilot/chat/mcp-servers
[copilot-cli-mcp]: https://docs.github.com/en/copilot/how-tos/copilot-cli/customize-copilot/add-mcp-servers